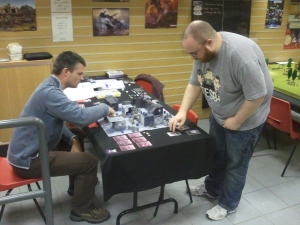
It’s taken a while, but the Wargames + Miniatures Game Store has hosted its first Deadzone match. This saw the Rebels face the Plague in a standard 70pt Strike team match. Joe brought his Rebel faction, and Baz deployed his recently completed Plague faction. The lists looked like this:
Rebels:
Rebel Commander (16)
Yndji Sergeant (8)
2 x Human Trooper (8)
Sorak (6)
Yndji Hunter (6)
Grogan with Onslaught Cannon (10)
Grogan with Desolator (12)
Total: 66 points (not sure if Joe miscounted, but he could have taken a drone if he wanted, or some equipment). 5 Command Actions.
Plague:
Stage 1A Commander (22)
Stage 2A (10)
Stage 3A General (10)
3 x Stage 3A (18)
1 x Stage 3A HMG with additional ammo item (7)
1 x Stage 3D Hellhound (3)
Total: 70 points. 6 Command Actions.
Mutations drawn were
- Acid breath which ended up on one of the Stage 3As after mistakenly putting it on the Stage 1. This is not legal as the Stage 1 does not have a shoot stat, and therefore doesn’t know how to use acid breath!
- Spiny Growths (adds Tough) allocated to the Stage 3D Hellhound
- Overactive Metabolism (adds agile) allocated to the Stage 2A.
The Stage 1, Stage 2 and Hellhound were all entering the combat area enraged, which adds to their melee chances, but detracts from shooting. No problem, as none of these models can shoot.
Missions were secretly drawn to determine how Victory Points (VPs) were earned with the following result:
Rebs: The Good Stuff. Scour. Receive 2 VPs for every item taken off the board via their deployment zone.
Plague: Close In: Infiltrate: Earn 1 VP per team member leaving the board via the Reb’s deployment zone. Kill: Earn 1 VP for each member of the Reb faction slain.
The first player to earn 10 VPs would be the winner. Alternatively, the game also has a built in timer. If all battle cards are drawn and used, the round on which you have no cards left to use is the end. Each faction starts the game with 20 battle cards randomly dealt.
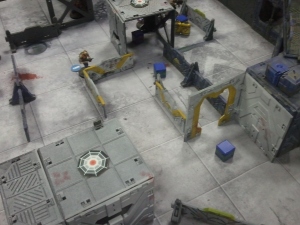
Using a mix of Baz’s unpainted & painted battlezone scenery supplemented by Geoff’s store Demo set, the board was set up and opposite corner deployment areas was drawn. This cuts the combat area into two diagonally with objective markers spaced across the middle of the board. (In this case the objective markers were redundant because of the mission drawn; however, neither player knew this at the start) Items were placed, and then the Plague was drawn to deploy first and start the game with initiative.
With a Command value of 3:3, the Plague could activate up to 6 models per turn within a game round. The Rebels had a 2:2 Commander and could activate up to 4 models per turn. The player that completes all their activations first gets the initiative in the following round. By starting first the Plague had a distinct advantage, as both strike teams consisted of 8 models. The Plague kept the initiative throughout the early part of the game.
With the strike teams assembled and the battle space sorted, the skirmish began.
The game consists of a series of rounds. In each round, players draw battle cards, and then activate their models in whatever order they wish. The player with initiative activates his models first and can hand across to the opponent at any point. If a player has fewer models than his opponent left to activate, he can choose to do nothing and wait until the opponent ‘catches’ up. Within a round, each player has ‘turns’ to activate his models. So in this game with the Plague holding the initiative, the First Round sequence looked like this:
Plague Turn 1 (6 models activated)
Rebs Turn 1 (4 models activated)
Plague Turn 2 (2 models activated)
Rebs Turn 2 (4 models activated).
Because the Plague completed all of their activations first, they kept the initiative for the second Round.
To keep the following battle report easy to read (and because detailed notes of who did what when weren’t kept) I’ve summarised the sequence of events without breaking it into individual turns within a round.
Note: A Command action uses up leaders action. The leader does nothing else, but rolls a test. If it passes it can choose to grant another model on its strike team a free short action, or alternatively it can distract (activate) an opposing model, or it can gain/regain battle cards.
Battlecards are played to supplement the basic actions your models can take, and are in addition to their normal movement/activity. A battlecard is ‘played on’ one of your models, even if the effect of the card does not apply to that model. A model cannot have more than one battlecard played on it per Round.
Both Command Actions and Battlecards are limited resources and therefore choosing when to play them is a critical part of the tactics of Deadzone.
Round 1:
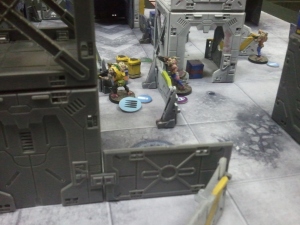
Plague: The infected ranks made a general advance into the centre of the Deadzone, uncovering a couple of items that were not much use initially – a medipack and a smoke grenade. The 3A General took a Command action (successful) and ordered the Hellhound to advance. Then a Move card was played on it, and it finally took its ‘fast’ movement, allowing it to advance 5 cubes straight towards the Rebel ranks in cover behind a building. The HMG tried to suppress the Grogan pair using the extra ammunition, but failed to find the target. One distract card was played on the Rebel Commander, denying her any actions in this first round.
Rebels: The rapid advance of the Hellhound spooked the Human troopers who moved to try and shoot the rabid animal. However, despite the clear shot (+ 2 dice to roll), a mix of poor rolling by Joe, the Spiny Growth mutations which countered the first point of damage and some good rolling by Baz, the hound survived unscathed. The Sorak took an elevated position and fired a blast into the HMG 3A. This hit and caused the heavy shooter to be blasted into an adjacent cube where he slammed into another 3A. Both 3As ended up pinned, but not injured. The Stage 2 was also adjacent to the blast and would have been pinned as well, but for a steadfast card conveniently played by Baz. The Yndji hunter and sergeant headed out for the nearest item boxes in pursuit of some VPs.
End of Round VP State: Plague 0, Rebels 0
Round 2:
Plague: The Hellhound completed its charge and moved in to fight 2 humans in the same cube. Despite the momentum, there was no winner. It must have been knackered after running so fast. The Stage 2 advanced on the left flank and the slow moving Stage 1 shambled up towards the right flank, but still too far away to do anything useful. The rest of the actions involved getting the pinned 3As back on their feet, and finding Armour Piercing (AP) ammo in a crate in the centre of the board. We ruled this was of no use to the Stage 3A HMG as the rule book says AP item can only be used for a shoot action. The HMG can only blaze away, so he left it. It remained there to the end of the game. Further blaze away actions and shooting were to no effect – the dice gods abandoning the Plague for this round. The Rebel Commander was suppressed but a steadfast card by Joe countered it. Another distract card was played to keep the rebel response down – but I can’t remember who it was played on.
Rebels: The humans both fought with the Hellhound, and managed to land a wound on it but it was still alive. That pesky dog just wouldn’t be put down! The Yndji sergeant uncovered an Ammo item on their left flank and then shot at a stage 3A inflicting a wound on it and pinning it. The rebel team remained largely static, taking blaze away and shoot actions on the advancing Plague. The blast from the Sorak had no effect on the Stage 1, as Joe only rolled one success on the blast roll. The Rebel Commander joined the Sorak in an elevated position and took a shot with her pistol which wounded a Stage 3A, pinning him in the process. The Grogans failed miserably with shooting and blazing away. The worst roll of the night was made by Joe, rolling 3 x 1s on a 3 dice shoot test for his Grogan Desolator. The Dice Gods were angry with the Rebels!
End of Round VP State: Plague 0, Rebels 0
Round 3:
Plague: The Hellhound tried to fight the humans, but must have had a hernia, as it got doubled on the dice roll, gifting the human opposition a free fight action in return. In this follow on fight, the pesky hellhound was finally slain. First blood to the Rebels! But no VPs. This also freed up the 2 humans in an elevated position which was a direct threat to the general advance of the plague force. Seeing the two humans slay the Hellhound, the HMG blazed away at them and succeeded in suppressing one human and pinning another – the threat was short lived. The Stage 2 advanced to threaten the Yndji hunter who was looking for items, and the Stage 1 advanced on the Sorak and Rebel Commander, ending up 2 cubes away in a threatening position. The Stage 3As in the centre advanced towards the Rebel deployment zone, mainly keeping to cover to avoid the attention of the Grogan pair in the corner. The wounded Stage 3A on the right flank regrouped and advanced, ignoring the Yndji sergeant and keeping his attention on the mission to get off the board. Risky move, but getting into a fight with a wound was just as risky. The 3A general remained in the backfield, supporting by taking another command action to support the general advance.
Rebels: The Yndji hunter saw the Stage 2A advancing on it and fled off the battle field via its own deployment zone taking a medipack with it (earning Joe 2VPs). The humans regrouped and one shot to no effect. The Grogan pair again had little effect trying to suppress and shoot the Stage 1 as it lumbered towards their Commander – the Survival 4 stat on it just proving too hard to beat in conjunction with some bad/good rolling. The Sorak and Commander stayed put in the face of the advancing Stage 1 and failed to have any luck in slowing its advance, although it did get its aggression reduced from enraged to alert.
End of Round VP State: Plague 0, Rebels 2
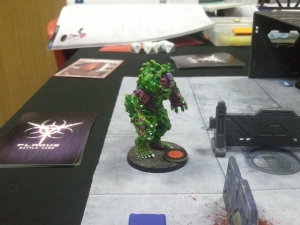
Round 4:
Plague: This is where it kicked off. A fortuitous draw of a move card to the Plague’s hand allowed the Stage 1 to advance the 2 cubes to get into melee with the Sorak and Rebel Commander. With 6 dice and a fight stat of 3, Baz rolled about 5 successes. The Sorak rolled 1. It was torn limb from limb and the Stage 1 became enraged again. With a free fight action, it next waded into the Rebel Commander and the result was even better. 6 successes – and the Rebel Commander’s energy shield completely failed. Joe needed to roll a 3 dice 6+ test, but rolled 2 1s and a 3, meaning the energy shield fizzled out without preventing any damage getting through. The Rebel Commander was minced. This immediately reduced the Rebels Command value to 2:1 (the Yndji Sergeant was now in charge) meaning only 3 Rebels could be activated per turn. The Stage 1 also got a free move action, and continued the advance by moving into the cube next to the 2 Grogans. Much to the Grogan’s puzzlement, the Stage 2A and a Stage 3A ran right past them and exited the board. Within the space of a few actions, the Plague had racked up 4 VPs! At this point, the Plague mission was out of the bag, but Joe had precious few resources now to do anything about it. The remaining 3As advanced towards the Rebel deployment zone, with one joining the Stage 1 next to the Grogans. The Stage 3 Commander remained in the backfield, supporting with command actions.
Rebels: One human grabbed an item and left the board as did the Yndji sergeant – grabbing a quick 4 VPs for the Rebels. The remaining human then sprinted to the nearest item and picked it up. However, with no actions remaining, and no cards or command actions to support, he had to wait before trying to flee with it. The Grogans again tried to stop the advance of the Plague, but were consistent in their ineffectiveness. They pinned one Stage 3A but failed to dent the Stage 1A – whatever it was they were shooting, it was bouncing off the tough hide of the commander.
End of Round VP State: Plague 4, Rebels 6
Round 5:
Plague: The Stage 1A descended on the Grogans like an avalanche. Both of them were reduced to a fine red paste. The Stage 1A took the free move towards the edge of the board, but couldn’t make it off the edge. A stage 3A stood up and departed the action followed by another – another 4 VPs for the Plague in three activations. The HMG made a beeline for the edge of the board and made it. The Plague VPs were now racking up swiftly.
Rebels: The last remaining human trooper sprinted back towards his deployment zone.
End of Round VP State: Plague 9, Rebels 6
Plague: With the Plague’s final Command Action, the 3A general tried to order the Stage 1 towards the edge of the board but failed to get the 3 successes needed, meaning his Command Action didn’t have the range to work. Instead, he chose to distract the human instead, and leave him tantalisingly short of the edge of the board. The Commander slowly lumbered towards impending victory.
Rebels: With the human distracted, the Rebels now had the initiative as they had completed activations first. With one model remaining this was not particularly useful.
Round 7:
The human sprinted for the edge of the board, but didn’t have the legs to make it. The Plague Stage 1A Commander stepped off the board to claim the Plague’s 10th VP and victory for the infected!
Final VP Count: Plague 10, Rebels 6.
Comments:
A really enjoyable game with lots of learning points. This was the first game for both of us, so a few errors were made. However, from the moment the Stage 1A got into melee, it was all downhill for the Rebels. That thing is a beast in melee – and very hard to kill with shooting. It acted as a bullet sponge, allowing the rest of the Plague faction to advance and perform relatively unhindered, albeit the Rebels did cause some wounds to the stage 3As. The agile mutation on the Stage 2 was also key – this allowed it to effectively sprint across the board without it needing command actions or cards, effectively freeing up those resources to help the rest of the team. The Plague used all their command actions; Joe chose not to use any for the Rebels. Coupled with the Plague holding the advantage with initiative and number of models activated, the game tipped in favour of the Plague.
Post game rules check:
- We were drawing the battlecards wrong. They add to your current hand, they do not replace it. The sequence should be: Put your current hand to one side. Draw the number of cards equal to the first number of your current commander’s command value. Discard down to the number of cards that equals the second number of your current commanders command value. Then add the cards to your current hand. The cards you choose not to keep go to the bottom of the draw deck, not the discard pile. (From the FAQ).
- The blast ‘to hit’ roll is an opposed roll by the target of the shot. We were playing it as an unopposed roll. (Again from the FAQ).
- Blaze Away can be AP but only with the ‘WEAK SPOT’ battle card. We were correct in not allowing the AP item to be used by the Plague HMG Stage 3A (as far as I can tell from the rules).
Thanks to Geoff for allowing us to use his demo pack to support the box set items, and for keeping the store open an hour later to allow us to complete the game! Also the coffee was much appreciated.
Thanks to Joe for coming across from Port Glasgow to act as Rebel Commander.
If anyone is interested in having a game of Deadzone and learning the rules, contact Geoff at the game store (Monday evenings look like becoming regular Deadzone evenings) via Facebook or calling 01389 298118


